Flutter + Fastlane (Part 1)
Automate your flutter app deployments locally

Let's start by understanding what CI/CD means. CI/CD stands for Continuous Integration and Continuous Delivery/Deployment, which is a process in software development that automates testing, building, and deploying code changes.
Continuous Integration focuses on frequently merging new code or changes to existing code, ensuring that it doesn't break the software. This is typically done using automated tests.
Continuous Delivery/Deployment automates the process of deploying new code changes to production or a testing environment.
CI/CD enables teams to deliver software faster and with better quality, while also reducing the risk of errors or bugs. It is a crucial practice in software development that helps streamline the development process.
By the end of this article, we would have a working CI/CD pipeline that tests, builds and deploys our Flutter application to Google Play Store, Apple App Store and Firebase Hosting.
Checklist
Checklist is a simple to-do app built in Flutter and available on GitHub, Play Store, App Store and Web.
It is also important to note that for an app to have a Continuous Delivery/Deployment setup, it must already be available in the store. That's why we'll be using Checklist in this article.
Fastlane
Fastlane is an open-source automation tool used primarily for mobile app development. It simplifies the process of building and deploying applications by automating tasks that are otherwise time-consuming.
Some of the tasks that can be automated using Fastlane include building the app, running tests, managing code signing, distributing beta builds, and releasing them to the stores.
Setting up Fastlane would require Ruby and Bundler to be available on your system. If you are on a Mac then you already have Ruby and can verify that using the ruby --version command (a minimum of Ruby 2.5 is required). For more info on setting up Ruby env and Bundler visit the documentation on Fastlane.
On a Mac, Fastlane can be easily installed using homebrew by running brew install fastlane
Local Automation
Unit Test
Checklist already has unit tests and considering I already have Flutter set up locally, simply running the flutter test command will execute all unit/widget tests. This command will be used in a Makefile to set up a local automation command.
Fastlane would have to be set up separately for Android and iOS so let's move on. Starting with Android.
Android Set Up
To deploy Checklist to the Google Play Store using Fastlane, a new Google Service Account JSON Secret must be generated. I honestly can not provide a better guide to this process than what has been documented on code magic which provides a step-by-step guide with pictures!
Once this JSON secrete is available, continue by placing the file in the android directory and then navigating to the directory in your project cd android. Once in this directory run the following command fastlane init or sudo fastlane init if it gets stuck. This would prompt you for the package name for the project and the path to json secret file. In my case, this was ifeanyi.checklist.android and /Users/ifeanyi/Projects/checklist_app/android/play_store_secret.json respectively.
This JSON Secrete file should be added to .gitignore and not checked into git.
A new Fastlane folder and some files will be generated after the init process completes. The AppFile holds variables used by different Fastlane actions while the Fastfile holds the different lanes which are a distinct set of tasks that can be executed individually or as part of a larger automation process.
The Appfile should look something like this
json_key_file("/Users/ifeanyi/Projects/checklist_app/android/play_store_secret.json")
package_name("<PACKAGE NAME>")
Though it would be better to use relative paths so it would also work flawlessly with GitHub actions which would be covered in the next article. So the AppFile should look like this
json_key_file("./play_store_secret.json")
package_name("<PACKAGE NAME>")
Since this article concentrates on Continuous Delivery/Deployment, the Fastfile will only feature the deploy lane, and everything else will be removed. The gradle task in the deploy lane should also be changed from gradle(task: "clean assembleRelease") to gradle(task: "clean bundle") so that an aab is generated instead of an apk which is the recommended way to upload builds to the Play Store.
Below would be the contents of the Fastfile
default_platform(:android)

platform :android do

  desc "Deploy a new version to the Google Play"
  lane :deploy do
    gradle(task: "clean bundle")

    upload_to_play_store
  end
end
To test this deploy lane we just have to run bundle exec fastlane deploy. This would fail at the current state because certain properties have not been provided to the upload_to_play_store action.
To find all the properties that can be configured for any action simply run bundle exec fastlane action <action name>. In this case that would be bundle exec fastlane action upload_to_play_store.
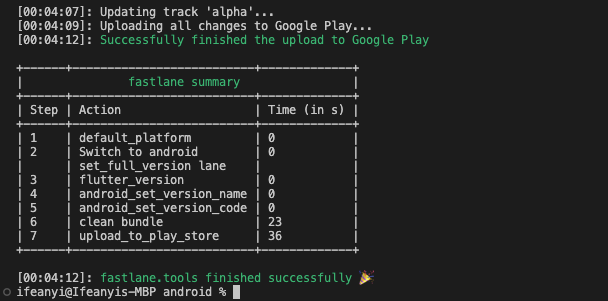
To get this deployment working we simply need to set the path to the aab generated by gradle. Also since I want to deploy to testing track and not production I will be setting the track property which has the following available options:
production: Deploys to Production
beta: Deploys to Open testing
alpha: Deploys to Closed testing
internal: Deploys to Internal testing
The Appfile would look like this now
default_platform(:android)

platform :android do

  desc "Deploy a new version to the Google Play"
  lane :deploy do
    gradle(task: "clean bundle")

    upload_to_play_store(
      aab: "../build/app/outputs/bundle/release/app-release.aab",
      track: "alpha"
    )
  end
end
With this setup, we will face an issue again when we run bundle exec fastlane deploy from within the android directory.
Google Api Error: Invalid request - APK specifies a version code that has already been used. This is because the local.properties file which contains the version used by gradle during the build process does not get updated after the version in pubspec.yaml has been updated. The version in the local.properties is usually automatically updated by Flutter when we run a command like flutter build appbundle but in this case, we would have to update the version directly in the app/build.gradle file after reading it from pubspec.yaml. This would also be beneficial when setting up GitHub action as the local.properties is not added to git.
To resolve this, we would create a new lane that reads the current version from the pubspec.yaml and updates the build.gradle. The newly created lane can then be called from within our deploy lane before the gradle build starts.
This new lane will make use of these community actions/plugins:
flutter_version: to read the version from thepubspec.yamlversioning_android: to update the version name and version code
To make use of plugins, they have to be installed first. This can be done using the following command fastlane add_plugin <action_name> from within the appropriate directory (i.e android directory in this case)
Run the following in the command line from within the android directory to add these plugins to Fastlane.
bundle exec fastlane add_plugin flutter_version
bundle exec fastlane add_plugin versioning_android
Adding the first plugin would cause a prompt that asks Should fastlane modify the Gemfile at path ... for you? enter y and press enter. A new Pluginfile will be genrated in the Fatlane folder.
The Pluginfile would look like this
# Autogenerated by fastlane
#
# Ensure this file is checked in to source control!

gem 'fastlane-plugin-flutter_version'
gem 'fastlane-plugin-versioning_android'
After adding the new lane set_full_version, the Fastfile would look like this
default_platform(:android)

platform :android do
  desc "Set Gradle Version and Build Number"
  lane :set_full_version do
        version = flutter_version()

        android_set_version_name(version_name: version['version_name'])

        android_set_version_code(version_code: version['version_code'])
    end

  desc "Deploy a new version to the Google Play"
  lane :deploy do
    set_full_version()

    gradle(task: "clean bundle")

    upload_to_play_store(
      aab: "../build/app/outputs/bundle/release/app-release.aab",
      track: "alpha"
    )
  end
end
In case you face build issues after the changes to set the version, remove the code that defines the flutterVersionCode and flutterVersionName in the app/build,gradle
// DELETE THESE

def flutterVersionCode = localProperties.getProperty('flutter.versionCode')
if (flutterVersionCode == null) {
    flutterVersionCode = '1'
}

def flutterVersionName = localProperties.getProperty('flutter.versionName')
if (flutterVersionName == null) {
    flutterVersionName = '1.0'
}
And make sure the initial value of the versionName is in a String format like this
    defaultConfig {
        applicationId "<YOUR APPLICATION ID>"
        minSdkVersion flutter.minSdkVersion
        targetSdkVersion flutter.targetSdkVersion
        versionCode 3
        versionName "1.0.1" // Should be a String
    }
With this setup, a new build can be deployed to the Play Store with no issues by first making sure the version has been updated in the pubspec.yaml and then simply running bundle exec fastlane deploy from within the android directory.
iOS Set Up
To deploy Checklist to the Apple App Store using Fastlane, first, navigate to the ios directory of the project cd ios. Once in this directory run the following command fastlane init or sudo fastlane init. This would ask What would you like to use fastlane for? and in my case, I want to Automate beta distribution to TestFlight which is option 2. So I enter 2 in the terminal and press enter to continue (This initial selection is needed to create a starting point, you can also create and edit the Fastfile ourselves).
The next step is to enter your Apple ID Username and the prompt then leads you to manually log in and select the Team and Developer portal that would be used.
Like the Android process, a new Fastlane folder and some files will be generated after the init process completes.
The Appfile would look something like this
app_identifier("<The bundle identifier of your app>")
apple_id("<Your Apple Developer Portal username>")

itc_team_id("<App Store Connect Team ID>")
team_id("<Developer Portal Team ID>")
While the Fastfile would have one lane. I changed the name of the lane from beta to deploy just to be consistent with what we have on Android.
default_platform(:ios)

platform :ios do
  desc "Push a new beta build to TestFlight"
  lane :deploy do
    build_app(workspace: "Runner.xcworkspace", scheme: "Runner")

    upload_to_testflight
  end
end
In other to be consistent with where the iOS build is stored after running a command like flutter build ipa, I will update the archive and output directory for the build_app action above. The location of the build would also be updated for the upload_to_testflight action now the contents of the Appfile would be
default_platform(:ios)

platform :ios do
  desc "Push a new beta build to TestFlight"
  lane :deploy do
    build_app(
      workspace: "Runner.xcworkspace",
      scheme: "Runner",
      archive_path: "../build/ios/Runner.xcarchive",
      output_directory: "../build/ios/Runner",
    )

    upload_to_testflight(
      ipa: '../build/ios/Runner/Runner.ipa',
      skip_waiting_for_build_processing: true,
    )
  end
end
Running the current setup will quit with an error saying an app-specific password is needed to authenticate with Apple services.
There are different ways to authenticate with Apple and one option would be to go to appleid.apple.com, sign in, and generate a new App-Specific Password which would then be added to the actions that need authentication.
The recommended way however would be to create a new App Store Connect API Key just like we created a new Google Service Account JSON Secret for Android. And even though it is a relatively short and straightforward process, the code magic documentation still does it better.
There are different ways to integrate this key with Fastlane and they can be found here. In this case, I will use the API Key JSON file approach. After the Key (.p8 file) has been successfully downloaded, create a new JSON file app_store_connect.json inside the ios directory with the following.
This JSON file should also be added to .gitignore and not committed to git.
{
  "key_id": "<KEY-ID>",
  "issuer_id": "<ISSUER-ID>",
  "key": "<CONTENT-OF-THE-DOWNLOADED-.p8-FILE>",
  "duration": 1200,
  "in_house": false
}
It is important to note that the value of the key has to be properly formatted with a \n to match every new line from the .p8 file and should look something like this else you might encounter an error like invalid curve name
{
  ...
  "key": "-----BEGIN PRIVATE KEY-----\nFirstLine\nSecondLine\nThirdLine\nFourthLine\n-----END PRIVATE KEY-----",
  ...
}
We then make use of this file by adding the api_key_path parameter to the upload_to_testflight action.
default_platform(:ios)

platform :ios do
  desc "Push a new beta build to TestFlight"
  lane :deploy do
    build_app(
      workspace: "Runner.xcworkspace",
      scheme: "Runner",
      archive_path: "../build/ios/Runner.xcarchive",
      output_directory: "../build/ios/Runner",
    )

    upload_to_testflight(
      api_key_path: "./app_store_connect.json",
      ipa: '../build/ios/Runner/Runner.ipa',
      skip_waiting_for_build_processing: true,
    )
  end
end
With this setup, we will face an issue again when we run bundle exec fastlane deploy from within the ios directory because of the version issue we faced with Android. We would also have to create a new lane to directly set the version name and build number in the info.plist.
For ios, we only need one community plugin flutter_version. So run the bundle exec fastlane add_plugin flutter_version from within the ios directory and follow the prompt if this is the first plugin added.
The newly created lane can then be called from within our deploy lane before the build_app starts. In the end, our Fastfile would look like this
default_platform(:ios)
platform :ios do
desc "Set Info.plist Version and Build Number"
lane :set_full_version do
version = flutter_version()
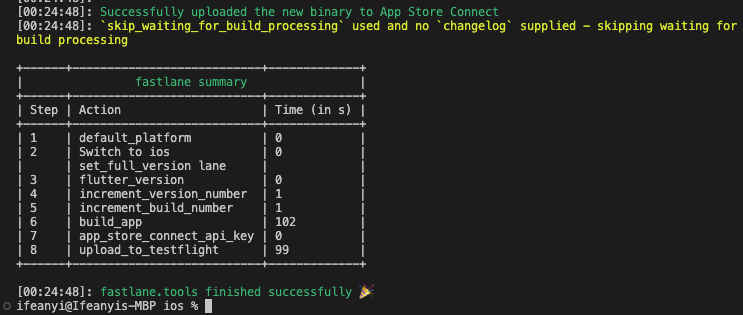
increment_version_number(version_number: version['version_name'])
increment_build_number(build_number: version['version_code'])
end
desc "Push a new build to TestFlight"
lane :deploy do
set_full_version()
build_app(
workspace: "Runner.xcworkspace",
scheme: "Runner",
archive_path: "../build/ios/Runner.xcarchive",
output_directory: "../build/ios/Runner",
)
upload_to_testflight(
api_key_path: "./app_store_connect.json",
ipa: '../build/ios/Runner/Runner.ipa',
skip_waiting_for_build_processing: true,
)
end
end
With this setup, a new build can be deployed to the App Store with no issues by first making sure the version has been updated in the pubspec.yaml and then simply running bundle exec fastlane deploy from within the ios directory.
Web
The web application is hosted with Firebase Hosting and to make a new deployment we only need two simple commands. flutter build web and firebase deploy. These commands will be used in the Makefile to deploy for the web.
Makefile
A Makefile is a special file used in software development that contains a set of instructions/rules that are used to build and maintain a software project.
When you run make in the command line, it reads the instructions in the Makefile and executes the necessary commands.
We are going to create a new file at the root of the project called Makefile and setup instructions that:
Runs test (unit or widget test)
Runs Fastlane
deploylane for androidRuns Fastlane
deploylane for iOSRuns Firebase web deployment commands
Runs all the above instructions one after the other
The contents of the Makefile are as follows.
test:
    @echo "╠ Running test..."
    flutter test

deploy-android:
    @echo "╠ Sending Android Build to Closed Testing..."
    cd android/fastlane && bundle exec fastlane deploy

deploy-ios:
    @echo "╠ Sending iOS Build to TestFlight..."
    cd ios/fastlane && bundle exec fastlane deploy

deploy-web:
    @echo "╠ Sending Build to Firebase Hosting..."
    flutter build web
    firebase deploy

deploy: test deploy-android deploy-ios deploy-web

.PHONY: test deploy-android deploy-ios deploy-web
The instructions can be executed individually depending on what is needed by using the command make <instruction>.
The deploy instruction would serve as our local automation and by simply running make deploy we can sit back and watch how:
All tests(unit or widget) are run
A new Android build is deployed to the Closed Testing track
A new iOS build is deployed to TestFlight
A new web build is deployed to Firebase Hosting
.PHONY is used to prevent name clashes e.g flutter test executes a command named test and we have also defined an instruction named test. if we run make test without adding test to the .PHONY list, it would not work. So it is good practice to list out your commands in the .PHONY list to avoid naming issues.
Conclusion
In summary, using Fastlane in conjunction with Makefile is an efficient way to automate the process of building and deploying your Flutter applications. This allows you to focus on more productive tasks or at least look cool as the computer does the boring work.
In the next article, GitHub Actions would be set up to use the local Fastlane pipeline. That way you can build and deploy our application on a remote computer running in the cloud.
So stay tuned!


