Flutter + Fastlane + GitHub Actions (Part 2)
Automate your flutter app deployments remotely

Introduction
In the previous article, Flutter + Fastlane, we discussed setting up Fastlane for building and deploying Android and iOS applications to the Play Store and App Store respectively. Makefile was also utilized to automate the testing, building, and deployment of the Flutter application (Checklist) with a single command from the terminal.
In this article, the focus would be on setting up GitHub Actions for testing, building and deploying the same application. The existing local Fastlane pipeline will also be utilized for Android and iOS, additionally, a new GitHub Release will be automatically created after every successful deployment.
The repository is available on GitHub here.
GitHub Actions
GitHub Actions is a continuous integration and continuous delivery (CI/CD) platform that allows you to automate your build, test, and deployment pipeline. You can create workflows that build and test every pull request to your repository, or deploy merged pull requests to production.
Let's define a few terms:
Workflows: This is simply an automated procedure that can contain one or more
jobs. Workflows can be triggered byeventsthat occur in the repository, such as push events or pull requests, by setting up ascheduleto run at specific times or intervals (e.g., daily, weekly, or monthly), or bymanualtriggers using the "run workflow" buttons in the GitHub UI.Jobs: These are the individual tasks that you define in a workflow. Jobs can be executed sequentially (one after the other) or in parallel (side by side). Each job can include multiple
stepsand is executed on runners, which are separate virtual environments that are responsible for executing the code in each job.Steps: These represent a specific action to be performed, such as running a script, checking out code, building a project, running tests, or deploying an application. Steps are executed sequentially, and the success or failure of each step determines the overall success or failure of the job.
Secrets: These are encrypted environment variables that can be used in workflows. They are used to store sensitive information, such as API keys, access tokens, and other secrets, securely in GitHub repositories.
Remote Automation
Unit Test
First, create these directories in the project folder .github/workflows/test.yml. Inside test.yml is where the workflow that would be run on every pull request to the repository would be defined.
Start by giving this workflow a name and defining the conditions in which it should be executed (i.e on pull request to the dev branch).
name: Run Unit Tests

on:
  pull_request:
    branches:
      - 'dev'
Then define a job called test which would make use of an ubuntu runner and have the following steps :
The first step will fetch the repository so the workflow has access to the code
The second step would configure the Flutter environment on the runner where the job is currently being executed using subosito/flutter-action.
The third step would run the test using the
flutter testcommand.
By the end, the test job should look like this
jobs:
  test:
    runs-on: ubuntu-latest

    steps:
      - name: Checkout Code
        uses: actions/checkout@v3

      - name: Setup Flutter Env
        uses: subosito/flutter-action@v2
        with:
          channel: 'stable'
          cache: true

      - name: Run Test
        run: |
          flutter pub get
          flutter test
Android Set Up
There are a few things to set up so the Android workflow has all it needs to run successfully.
The app/build.gradle file depends on two other files (key.properties and local.properties) to build the Android app. These files are not included in git and therefore when the repository is fetched in GitHub actions it will not have these files. Therefore we need to create the files and their content in the workflow. We would achieve this by using secrets.
First, let's start with the storeFile which holds the file path of the .jks key used to sign our application during the build. This file path cannot be used on GitHub actions as the path would not exist so we need to add the .jks file directly to the application for local builds and GitHub secrets for the remote build.
Add the key.jks file to the android directory and update the signing config in the app/build.gradle to accommodate this change.
signingConfigs {
    release {
        storeFile file('../key.jks')
        ...
    }
}
We can also get rid of the storeFile property in the key.properties as the path is no longer needed. The content of the key.properties will be added as GitHub secrets and used to recreate the file during the workflow.
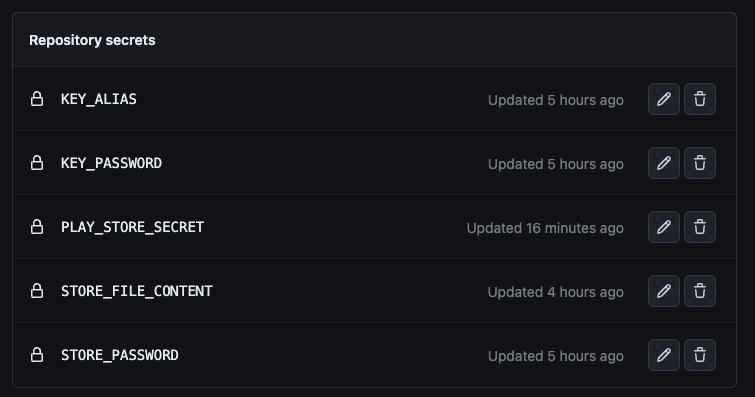
To add a new secret simply navigate to the settings/secrets/actions path of your repository and use the New repository secret button.
The value for the key.jks and the Google Play JSON Secret that would be added as a GitHub secret needs to be converted to base64. On a Mac this can be done using the following command base64 -i path/to/file.ext | pbcopy which copies the converted base64 directly to the clipboard.
We should have the following secrets at the end:
Now that the initial setup is done. Create a new file that would hold the deploy workflow .github/workflows/deploy.yml. Give the workflow a name and trigger condition.
name: Deploy

on:
  push:
    branches:
      - 'main'
Next, set up a job called android which would run the following steps on ubuntu runner.
Fetch the repository
Set up Flutter environment
Create/configure
key.propertiesfileCreate/configure
local.propertiesfileCreate/configure
play_store_secretfileSet up Ruby (Fastlane environment)
Run
make deploy-android, from the local Fastlane pipeline
While creating the local.properties file we only need to set the flutter.sdk path as it is the only thing currently required by our build.gradle
We also need to commit gradlew to the project by removing the following from android/.gitignore as it is required during the build process.
gradle-wrapper.jar
/gradlew
/gradlew.bat
By the end, the android job should look like this
android:
runs-on: ubuntu-latest

steps:
- name: Checkout Code
  uses: actions/checkout@v3

- name: Setup Flutter
  uses: subosito/flutter-action@v2
  with:
    channel: stable
    cache: true

- name: Set up key.properties
  run: |
    echo "keyPassword=${{ secrets.KEY_PASSWORD }}" > android/key.properties
    echo "storePassword=${{ secrets.STORE_PASSWORD }}" >> android/key.properties
    echo "keyAlias=${{ secrets.KEY_ALIAS }}" >> android/key.properties
    echo "${{ secrets.STORE_FILE_CONTENT }}" | base64 --decode > android/key.jks

- name: Set up local.properties
  run: |
    echo "flutter.sdk=$FLUTTER_ROOT" > android/local.properties

- name: Set up Play Store Secret
  run: |
    echo "${{ secrets.PLAY_STORE_SECRET }}" | base64 --decode > android/play_store_secret.json

- name: Setup Fastlane
  uses: ruby/setup-ruby@v1
  with:
    ruby-version: 2.6
    rubygems: latest

- name: Build and Deploy
  run: |
    flutter pub get
    make deploy-android
To get the make deploy-android command working, we need to update it to install packages first by adding the bundle install command.
deploy-android:
    @echo "╠ Sending Android Build to Closed Testing..."
    cd android && bundle install
    cd android/fastlane && bundle exec fastlane deploy
iOS Set Up
When it comes to Fastlane and GitHub actions for iOS the major hurdle would be code-signing. There are different ways this can be handled but when using Fastlane the recommended way would be to use Match. With Match you get to share one code-signing identity across your development team.
This process involves:
Creating a new private GitHub repository that would store your certificates and profiles
Creating new certificates and profiles and pushing them to the repository
Providing a way for our workflow to access the repository so the certificates and profiles can be downloaded and installed on Xcode during the build process.
First, create a new private GitHub repository and get the URL. Next, run the following command fastlane match init from within the ios directory to set up Match. This would ask you to select a storage mode. Select git and hit enter. Next, enter the URL of the private repository when prompted. This would create a new file called Matchfile in the Fastlane folder.
Open the Matchfile and update a few things. Change type("development") to type("appstore") and then un-comment the lines with app_identifier and username. Fill in the correct details and the Matchfile should look like this.
git_url("<YOUR-PRIVATE-GIT-URL")

storage_mode("git")

type("appstore")

app_identifier(["<YOUR-APP-BUNDLE-ID>"])
username("<YOUR-APPLE-DEVELOPER-USERNAME>")
To create and push the certificate and provisioning profile using Match simply run fastlane match appstore from within the ios directory. This would ask for a passphrase that would be used to encrypt/decrypt the certificates.
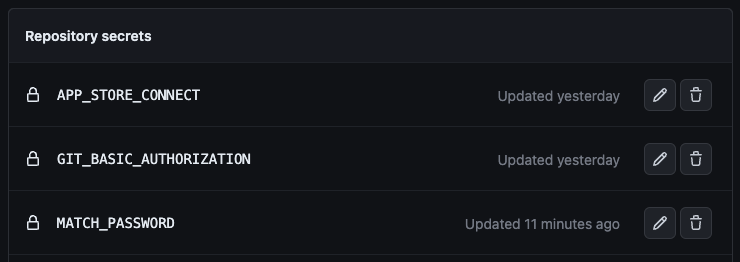
This passphrase should be added to GitHub secrets using the name MATCH_PASSWORD as it would be required in the workflow.
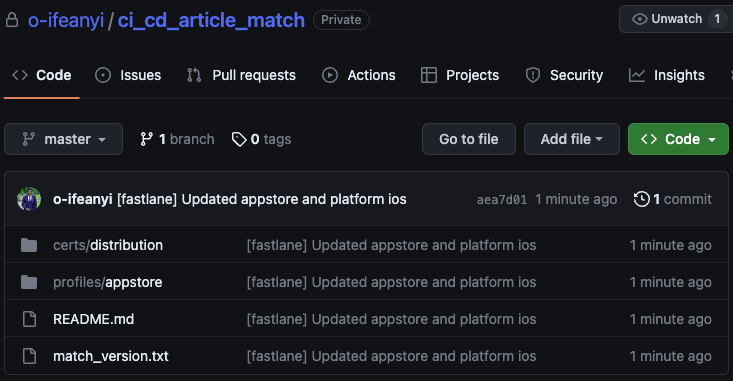
If this is successful then the repository should contain the newly created certificates and profiles.
Next, we need to provide a way for our workflow to be able to authenticate with GitHub and access this repository. This can be done by adding a git_basic_authorization, git_bearer_authorization or git_private_key field to match. I will make use of a git_basic_authorization which will be added to GitHub Secret and passed to Fastlane as an environmental variable from the workflow.
To create a git_basic_authorization, first, generate a personal acces token from GitHub > Settings > Developer Settings > Personal Access Tokens. Click the Generate new token button and enter a name and an expiry date.
Under Repository Access, select only select repositories this would give you the option to then select the private repository created earlier for Match.
Under Permissions, provide read-only access to Contents and create the token. Make sure to copy the token as you won't have access to it again after leaving the page.
Run the following command in the terminal to create a Git basic authorization in base64 echo -n your_github_username:your_personal_access_token | base64. Copy the output and add it as a GitHub secret to our project repository with the name as GIT_BASIC_AUTHORIZATION
Convert the app_store_connect.json file to base64 and add it as a secret too. This can be done using the following command base64 -i path/to/file.ext | pbcopy which copies the converted base64 directly to the clipboard.
Next, update the deploy lane for iOS to make use of Match for code signing by adding the following code before the build_app action.
    match(
      type: "appstore",
      readonly: is_ci,
    )
When running in a CI environment certain things need to be set up for iOS like creating a keychain and there is an action for that called setup_ci. The certificates and profiles downloaded by Match are stored in the keychain until it is ready to be used. For this, we need to setup_ci before calling match.
Cocoapods need to be setup also to install Pods in the CI environment. This can easily be done by adding gem "cocoapods" to the Gemfile in the ios directory and then running bundle install from that directory.
This is what the Gemfile looks like after adding cocoapods
source "https://rubygems.org"

gem "fastlane"
gem "cocoapods"

plugins_path = File.join(File.dirname(__FILE__), 'fastlane', 'Pluginfile')
eval_gemfile(plugins_path) if File.exist?(plugins_path)
Next, add the setup_ci and cocoapods action to the Fastfile
    set_full_version()

    setup_ci if is_ci

    cocoapods(clean_install: is_ci)

    match
      ...
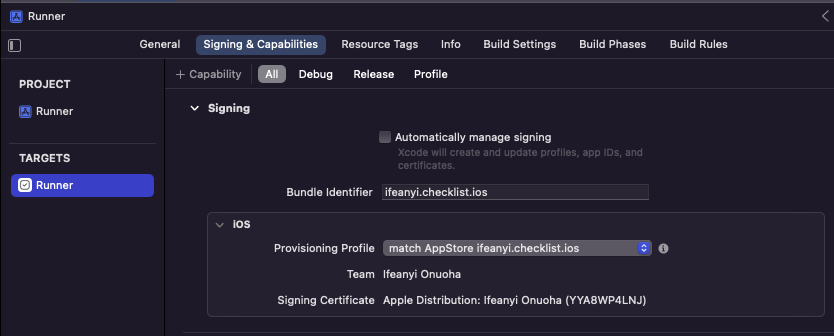
In other to ensure Match is used for code signing, Xcode Signing & Capabilities for the project should be updated to use the manual code signing option. The changes this makes in the project.pbxproj file would also be used in the build process on GitHub actions.
Next, set up a job called ios which would run the following steps on macos runner.
Fetch the repository
Set up Flutter environment
Create/configure
app_store_connect.jsonfileSet up Ruby (Fastlane environment)
Run
make deploy-ios, our local Fastlane pipeline
By the end, the ios job should look like this
ios:
runs-on: macos-latest

steps:
- name: Checkout Code
  uses: actions/checkout@v3

- name: Setup Flutter
  uses: subosito/flutter-action@v2
  with:
    channel: stable
    cache: true

- name: Set up App Store Connect
  run: |
    echo "${{ secrets.APP_STORE_CONNECT }}" | base64 --decode > ios/app_store_connect.json

- name: Setup Fastlane
  uses: ruby/setup-ruby@v1
  with:
    ruby-version: 2.6
    rubygems: latest

- name: Build and Deploy
  run: |
    flutter pub get
    make deploy-ios
  env:
      MATCH_PASSWORD: ${{ secrets.MATCH_PASSWORD }}
      MATCH_GIT_BASIC_AUTHORIZATION: ${{ secrets.GIT_BASIC_AUTHORIZATION }}
Notice that the MATCH_GIT_BASIC_AUTHORIZATION and MATCH_PASSWORD is passed as an environmental variable from the workflow to the Fastlane deploy-ios step.
The parameters that are set on a Fastlane action can also be set using environmental variables. If you run bundle exec fastlane action match you would see the environmental variable name for each parameter.

To get the make deploy-ios command working, we need to update it to install packages first by adding the bundle install command.
deploy-ios:
    @echo "╠ Sending iOS Build to TestFlight..."
    cd ios && bundle install
    cd ios/fastlane && bundle exec fastlane deploy
Web Setup
First, make sure you have set up hosting. If you have not set up Hosting, run the following command from the root of your project firebase init hosting. If you already set up Hosting, then you just need to set up the GitHub Action part of Hosting by running the following command firebase init hosting:github.
This will prompt you to enter the repository using the following format user/repository. For me, that was o-ifeanyi/ci_cd_article. This would automatically create and upload a service account JSON to GitHub secret.

The prompt continues to help set up two workflows. One is to deploy your changes to the preview channel of Firebase Hosting on every pull request and the second workflow is to deploy a live build to Firebase Hosting on merge to your main branch.
Since I want to add the web deployment process as a job on the already existing deploy workflow. I am simply going to copy the deploy step from the autogenerated workflow and delete them when done.
Next, set up a job called web which would run the following steps on ubuntu runner.
Fetch the repository
Set up Flutter environment
Generate a web build
Deploy web build (This step was gotten from the auto-generated workflow from the setup process)
By the end, the web job should look like this
web:
runs-on: ubuntu-latest

steps:
  - name: Checkout Code
    uses: actions/checkout@v3

  - name: Setup Flutter
    uses: subosito/flutter-action@v2
    with:
      channel: 'stable'
      cache: true

  - name: Make Web Build
    run: |
      flutter pub get
      flutter build web

  - name: Deploy Web Build
    uses: FirebaseExtended/action-hosting-deploy@v0
    with:
      repoToken: '${{ secrets.GITHUB_TOKEN }}'
      firebaseServiceAccount: '${{ secrets.FIREBASE_SERVICE_ACCOUNT_CHECKLIST_6A64E }}'
      channelId: live
      projectId: checklist-6a64e
GitHub Release
For the automated GitHub release, set up a job called tag which would run the following steps on ubuntu runner but only after the android ios and web jobs have finished successfully.
Fetch the repository
Get the current Fluter version from the
pubspec.yamlUse the marvinpinto/action-automatic-release action to create and release a new tag
By the end, we should have a tag job like this
tag:
runs-on: ubuntu-latest
needs: [android, ios, web]

steps:
- name: Checkout Code
  uses: actions/checkout@v3

- name: Get Flutter Version
  run: |
    versionName=`cat pubspec.yaml | grep -o 'version:[^:]*' | cut -f2 -d":" | xargs`
    echo "VERSION_NAME=v$versionName" >> $GITHUB_ENV

- name: Create Tag and Release
  uses: "marvinpinto/action-automatic-releases@latest"
  with:
    repo_token: ${{ secrets.GITHUB_TOKEN }}
    title: ${{ env.VERSION_NAME }}
    automatic_release_tag: ${{ env.VERSION_NAME }}
    draft: false
    prerelease: false
Conclusion
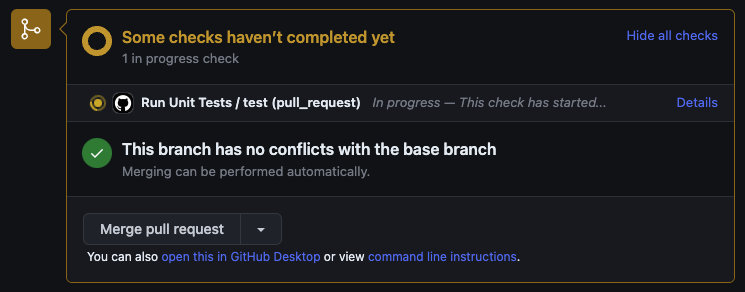
With this setup whenever a pull request is opened from a feature branch to merge with the dev branch the test workflow which runs all unit/widget tests would be run automatically and should pass before the merge is done.
And when a new deployment is needed, simply make sure the version number in the pubspec.yaml has been correctly updated in the dev branch. Open a pull request from the dev branch to the main branch.
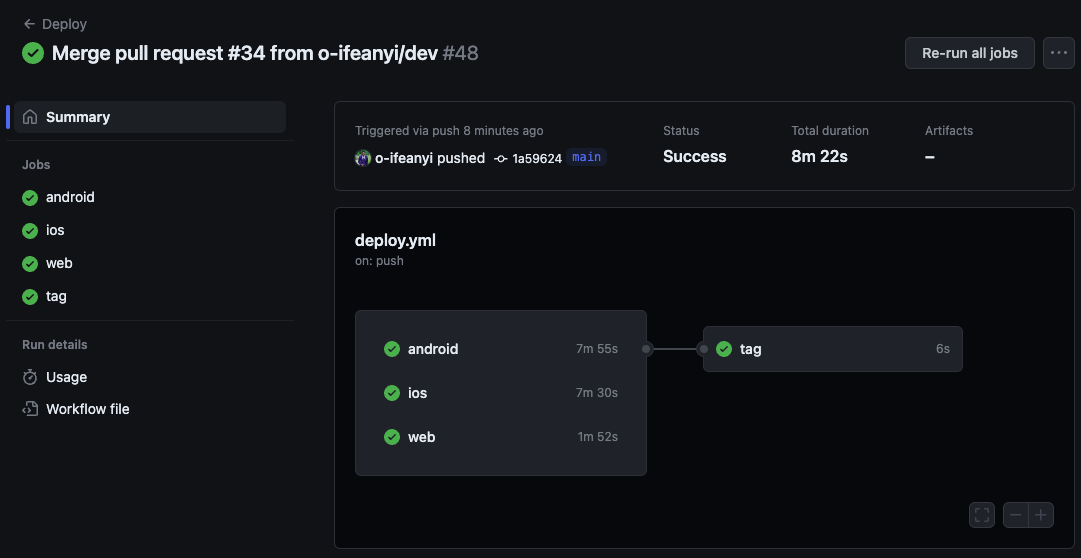
Merging this pull request would kick off the deploy workflow which would:
Build and deploy to Google Play Store Internal Testing
Build and deploy to Apple App Store TestFlight
Build and deploy to Firebase Hosting
Create a new GitHub Release
If you encounter any challenges with this setup or find room for improvement do reach out to me on Twitter.
Checkout the full code on GitHub.


