Using MethodChannel in Flutter
Writing custom platform-specific code using method channel
In flutter there are lots of packages that already implement native feature you might need but in a case where you don't find one that suites your need or you just want total control you can use the method channel to implement features natively i.e. using java or kotlin for android and swift or objective C for IOS.
How it works is simple. The Flutter portion of the app sends messages to its host, the iOS or Android portion of the app, over a platform channel. The host listens on the platform channel, and receives the message. It then calls into any number of platform-specific API's using the native programming language and sends a response back to the client, the Flutter portion of the app.
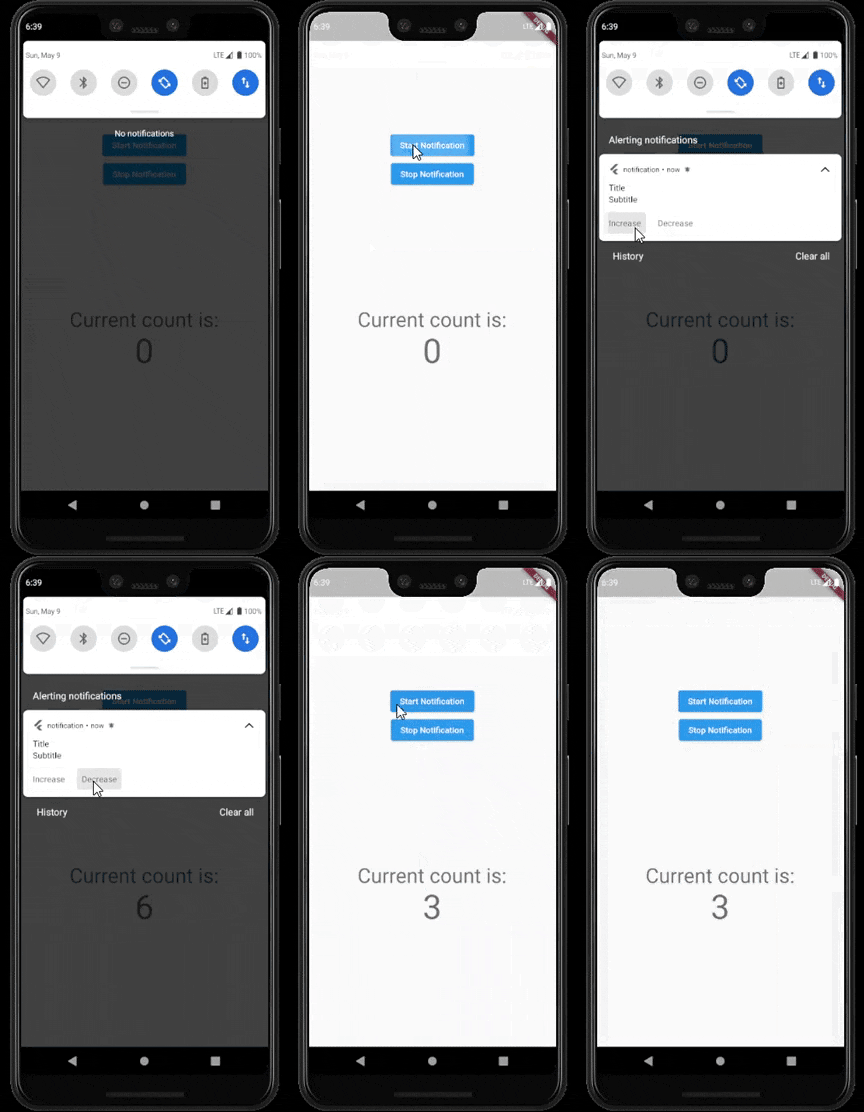
In this article we would build an application that starts and stops a native notification from the flutter side. We would also interact with the native notification to make changes on the flutter side. To keep it simple the application is going to be a counter app with the increase and decrease functionality being triggered from the native notification. This would be implemented on android only since I'm on a window machine.

The Full Code is also available on GitHub
Getting Started
We simply create a new project (with java as the desired language for android) using flutter create, then navigate to the project folder and run flutter pub get.
flutter create -a java example

cd example

flutter pub get
When creating a project you can choose any configuration you're more comfortable with. For example, to use swift for IOS and kotlin for android or Ojective C and Java:
flutter create -i swift -a kotlin package_name
flutter create -i objc -a java package_name
The layout of the app is going to be two buttons, one to start the notification and another to end it, then a text that displays the current count.
This is what main.dart would look like
import 'package:flutter/material.dart';

void main() {
  runApp(MyApp());
}

class MyApp extends StatelessWidget {
  @override
  Widget build(BuildContext context) {
    return MaterialApp(
      title: 'Flutter Demo',
      theme: ThemeData(
        primarySwatch: Colors.blue,
      ),
      home: MyHomePage(),
    );
  }
}

class MyHomePage extends StatefulWidget {
  @override
  _MyHomePageState createState() => _MyHomePageState();
}

class _MyHomePageState extends State<MyHomePage> {
  int _counter = 0;

  @override
  Widget build(BuildContext context) {
    return Scaffold(
      body: Center(
        child: Column(
          mainAxisAlignment: MainAxisAlignment.center,
          children: <Widget>[
            Spacer(),
            ElevatedButton(
              onPressed: () {},
              child: Text('Start Notification'),
            ),
            ElevatedButton(
              onPressed: () {},
              child: Text('Stop Notification'),
            ),
            Spacer(),
            Text(
              'Current count is:',
              style: Theme.of(context).textTheme.headline4,
            ),
            Text(
              '$_counter',
              style: Theme.of(context).textTheme.headline2,
            ),
            Spacer(),
          ],
        ),
      ),
    );
  }
}
Creating a Channel
To create a channel you simply create an instance of MethodChannel class and pass in a name.
final channel = MethodChannel('notification');
Next well create two async functions that would be linked to the buttons create earlier. The functions would call the invokeMethod (with a name) on the channel we just created. The invokeMethod also has a parameter to pass arguments but we wouldn't be making use of that.
void _startService() async {
    try {
      await channel.invokeMethod('create');
    } catch (error) {
      print(error);
    }
  }

  void _stopService() async {
    try {
      await channel.invokeMethod('destroy');
    } catch (error) {
      print(error);
    }
  }
And since we are not handling this on the native side, when the button is tapped we get an error that says MissingPluginException(No implementation found for method startForegroundService on channel foregroundService). This would be resolved once we handle the invokeMethod natively.
Writing Native Code
The next step would be to implement the functionality natively.
Fist navigate to the MainActivity.java file
android > app > src > main > java > com > example > MainActivity.java . This is where we would handle the method calls.
MainActivity.java file
package com.example;

import io.flutter.embedding.android.FlutterActivity;

public class MainActivity extends FlutterActivity {
}
Create variables to hold the methodChannel, channel name, notificationManager and notification ID. The channel name must be the same with the one passed as an argument to MethodChannel class on the flutter side.
public static MethodChannel methodChannel;
public final String channelName= "notification";
NotificationManagerCompat notificationManager;
public final String NOTIFICATION_ID = "Channel_ID";
The notificationManager would be instantiated in the onCreate method of the MainActivity
@Override
protected void onCreate(@Nullable Bundle savedInstanceState) {
    super.onCreate(savedInstanceState);
    notificationManager = NotificationManagerCompat.from(this);
}
Next we would override the configureFlutterEngine method which would give us access to the flutterEngine
@Override
    public void configureFlutterEngine(@NonNull FlutterEngine flutterEngine) {
        super.configureFlutterEngine(flutterEngine);
    }
We then instantiate the methodChannel variable and call the setMethodCallHandler. This handles the methods we invoke from the flutter side, it gives us access to the method name and sends back result to flutter side.
methodChannel = new MethodChannel(
                flutterEngine.getDartExecutor().getBinaryMessenger(),
                channelName);

methodChannel.setMethodCallHandler(((call, result) -> {

}));
Now we can respond to the method calls we invoked from the flutter side by checking the name of the method.
if (call.method.equals("create")) {
     // Code to create notification
}
if (call.method.equals("destroy")) {
     // Code to end notification
}
If you're like me and don't know java or kotlin you can always checkout the android developer docs for whatever you need, which in this case is how to display notification. And thanks to the docs this is what our create method looks like
if (call.method.equals("create")) {
    NotificationCompat.Builder builder = new NotificationCompat.Builder(
                this,
                NOTIFICATION_ID)
        .setContentTitle("Title")
        .setContentText("Subtitle")
        .setSmallIcon(R.mipmap.ic_launcher)
        .setOngoing(false);

    notificationManager.notify(0, builder.build());
    result.success(null);
}
And to end the notification
if (call.method.equals("destroy")) {
     notificationManager.cancel(0);
     result.success(null);
}
That was easier than I thought it would be 😅. With this you should be able to start and stop the notification. Next is to add buttons for the increase and decrease functionality which will be invoked from the native side and implemented in the flutter side.
To add buttons to the notification you use the .addAction method. This method takes an icon, a name and a pending intent which is what would execute when it is tapped.
NotificationCompat.Builder builder = new NotificationCompat.Builder(
            this,
            NOTIFICATION_ID)
      // ...
      .addAction(R.mipmap.ic_launcher, "Increase", getIntent(true))
      .addAction(R.mipmap.ic_launcher, "Decrease", getIntent(false));
In order to know what the pending intent should do we would assign an action to it using the .setAction method
private PendingIntent getIntent(boolean isIncrease) {
    Intent intent = new Intent(this, Notification.class);
    if (isIncrease) {
        intent.setAction("increase");
    } else {
        intent.setAction("decrease");
    }
    return PendingIntent.getBroadcast(this, 0, intent, 0);
}
Invoking Flutter Code From Native Side
The Notification class from the intent above would extend the BroadcastReceiver class which has an onReceiveMethod that gives us access to the intent that was passed from the button we pressed. We can then get the action from the intent and invoke a method that would be executed on the flutter side depending on what the action was.
And according to the docs the class would also be registerd in the AndroidManifest file as a receiver.
<application>
    // ...
    <receiver android:name=".Notification"  android:exported="true">
    </receiver>
</application>
Create a Notification.java file to holds the Notification class.
package com.example.notification;

import android.content.BroadcastReceiver;
import android.content.Context;
import android.content.Intent;

import static com.example.notification.MainActivity.methodChannel;

public class Notification extends BroadcastReceiver {

    @Override
    public void onReceive(Context context, Intent intent) {
        final String action = intent.getAction();
        if (action == null) {
            return;
        }
        switch (action) {
            case "increase":
                methodChannel.invokeMethod("increase", "");
                break;
            case "decrease":
                methodChannel.invokeMethod("decrease", "");
                break;
        }
    }
}
Now that we are invoking from the native side we would need to setup a handler on the flutter side. This can be done in the initState method of the MyHomePage class.
@override
  void initState() {
    super.initState();
    channel.setMethodCallHandler((call) {
      if (call.method == 'increase') {
        setState(() {
          _counter++;
        });
      } else if (call.method == 'decrease') {
        setState(() {
          _counter--;
        });
      }
      return;
    });
  }
The handler simply checks what method was invoked and acts accordingly by either increasing or decreasing the counter value and calling setState to update the screen.
Thanks for reading
The Full Code is available on GitHub
For more info on working with android notifications you can visit the Android developer guide
You can also checkout the Flutter docs for more info on using MethodChannel.
