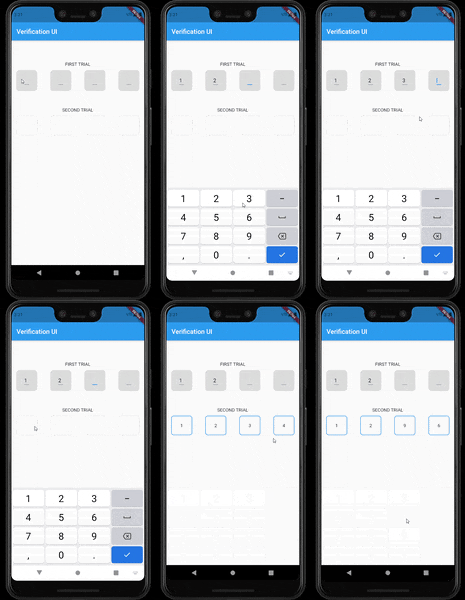
Recently I've been working on two projects both of which required a screen that takes a four digit number as part of the verification/authentication process.
Seeing as this is something I haven't done before and it looked quite simple, I thought it'll be a fun challenge to come up with a solution myself and not use a package. But when I tried implementing it on the first project things got complicated really fast, and what I came up with still had a lot of loop holes I couldn't cover.
I was thinking to myself, this shouldn't be that hard! I mean its flutter for crying out loud. I decided It'll remain like that until I can think of something better or use a package if it becomes urgent.
After a while I came across the same feature in the second project, so I'm like ok. Time for round two.
In this article I'm going to take you through my thought process, but if its the solution you're after you can find it here

First Trial
After I saw the UI I immediately thought to myself, Ok I'll need to create four boxes in a row each of which has a text field. Then I'll need to know when a value has been entered in the text field that way I can shift the focus to the next text field. Doesn't sound complicated at all right?
So I started with four boxes in a row each having a text field
Widget build(BuildContext context) {
    return Row(
      mainAxisAlignment: MainAxisAlignment.spaceBetween,
      children: List.generate(
        4,
        (index) => Container(
          alignment: Alignment.center,
          padding: EdgeInsets.symmetric(
            vertical: 20,
            horizontal: 25,
          ),
          decoration: BoxDecoration(
            color: Theme.of(context).dividerColor,
            borderRadius: BorderRadius.circular(10),
          ),
          child: SizedBox(
            width: 15,
            height: 25,
            child: TextField(),
          ),
        ),
      ),
    );
  }
Check ✅
Next I needed a way to change focus, that way when I type into the first text field the second one would automatically get focused on. That's where focus nodes come in. Each text field needs its own focus node.
final _boxFocus1 = FocusNode();
final _boxFocus2 = FocusNode();
final _boxFocus3 = FocusNode();
final _boxFocus4 = FocusNode();
Since I was making use of List.generate() to create the boxes, I had access to an Index so I thought It would make sense to have the focus nodes in a list too, that way I can pass them to their respective text fields using the Index.
List<FocusNode> _focus;

@override
void initState() {
    super.initState();
    _controllers = [
      _boxController1,
      _boxController2,
      _boxController3,
      _boxController4,
    ];
    _focus = [
      _boxFocus1,
      _boxFocus2,
      _boxFocus3,
      _boxFocus4,
    ];
}

child: TextField(
    focusNode: _focus[index],
    keyboardType: TextInputType.number,
),
Check ✅
Next I needed a way to collect the values from the text field. So I decided to go with TextEditingControllers. Four controllers, one for each box, just like the focus nodes.
final _boxController1 = TextEditingController();
final _boxController2 = TextEditingController();
final _boxController3 = TextEditingController();
final _boxController4 = TextEditingController();

List<TextEditingController> _controllers;

@override
  void initState() {
    super.initState();
    _controllers = [
      _boxController1,
      _boxController2,
      _boxController3,
      _boxController4,
    ];
}
So at this point my TextField looked like this
child: TextField(
    controller: _controllers[index],
    focusNode: _focus[index],
    keyboardType: TextInputType.number,
),
Check ✅
With all these controllers and focus nodes it was already looking too complicated. Anyway, with everything setup It was time to get it working
The plan was simple when a number is entered loop through the text field and add their values together then move to the next box. If its the last box, close the keyboard.
onChanged: (val) {
     // add all values together
    setState(() {
        _value = _controllers.fold<String>(
        '', (prevVal, element) => prevVal + element.text);
    });
    // if user hasn't gotten to the last box then focus on the next box
    if (index + 1 < _focus.length) {
        _selectedFocus = _focus[index + 1];
        FocusScope.of(context).requestFocus(_selectedFocus);
    // if user has gotten to last box close keyboard
    } else {
        FocusScope.of(context).unfocus();
    }

    print(_value);
},
Check ✅
And that was it. It works perfectly and seamlessly as long as you don't make any mistakes while imputing the numbers 😁. Because the way It is now the logic works one way (Forward). To be able to delete I would have to Implement same logic in reverse and that's what got me twisted.
Beside there were so many other ways for it to get frustrating which I ended up writing more logic for (you don't even want to know 😪). Lol only me can make a task of entering four digits a complicated matter. Anyway we move.
Second Trial
To Improve we simply have to do stuff and make mistakes right?
When I saw the same feature In the second project I at least knew I definitely wasn't going to try my previous method. I still didn't want to use a package because at this point it'll be like I was beaten by four boxes with numbers 😂.
So this time I thought to myself. What do I really need?
Obviously I needed four boxes that held numbers. My Issue was how to get and handle the numbers in a seamless manner.
My thought process this time around was, If I could just get the user to enter four numbers (doesn't matter how) I can distribute them to the boxes myself. That way I wouldn't need all the controllers and shifting focus wahala.
The only way I know how to collect input through the keyboard is by using a text field. The alternative would be to create my own number keyboard UI and that just seems like too much work for four numbers.
First, Create the boxes
Row(
      mainAxisAlignment: MainAxisAlignment.spaceBetween,
      children: List.generate(
        4,
         (index) {
             return Container(
                 alignment: Alignment.center,
                 width: 60,
                 height: 60,
                 decoration: BoxDecoration(
                      color: theme.scaffoldBackgroundColor,
                      border: Border.all(
                            color: theme.accentColor,
                      ),
                      borderRadius: BorderRadius.circular(8),
                  ),
                  child: Text('2'),
                );
             },
          ),
),
Check ✅
Then I created a single text field with a single controller and a single focus node, because think about it. If a user entered 1234 into a single text field I can easily do this
String input = textEditingController.text;
And the text value of each box in the row would be
input[index]
// index is available because I use List.generate() to create the boxes
This is what the text field looked like
TextField(
       controller: _codeController,
       focusNode: _codeFocus,
       keyboardType: TextInputType.number,
       maxLength: 4,
       decoration: InputDecoration(
              border: InputBorder.none,
        ),
        inputFormatters: [
               FilteringTextInputFormatter.allow(RegExp(r'^[0-9]+$')),
        ],
        onChanged: (val) {
           setState(() {
                 _code = val;
            });
            if (val.length == 4) {
                  _codeFocus.unfocus();
            }
            print(_code);
         },
),
I found this bit on Stack Overflow because I was able to enter things like periods and hyphens (. -) which is available on the numbers keyboard.
inputFormatters: [
     FilteringTextInputFormatter.allow(RegExp(r'^[0-9]+$')),
],
This way only digits can be entered, and with the maxLenght = 4, only four digits can be entered. Cool huh?
So now I could get the digits, I could assign theme individually to the boxes using the index. I was even able to highlight the borders of the boxes if it had a number.
Row(
       mainAxisAlignment: MainAxisAlignment.spaceBetween,
       children: List.generate(
        4,
        (index) {
             String text = '';
             if (_code.length > index) {
                text = _code[index];
             }
             return GestureDetector(
                 onTap: () {
                     FocusScope.of(context).requestFocus(_codeFocus);
                  },
                 child: Container(
                     alignment: Alignment.center,
                     width: 60,
                     height: 60,
                     decoration: BoxDecoration(
                         color: theme.scaffoldBackgroundColor,
                         border: Border.all(
                            width: text.isEmpty ? 1 : 1.5,
                            color: text.isEmpty
                                  ? theme.shadowColor.withOpacity(0.1)
                                  : theme.accentColor,
                          ),
                          borderRadius: BorderRadius.circular(8),
                       ),
                       child: Text(text),
                    ),
                 );
               },
          ),
 ),
Check ✅
Only Issue was I could clearly see the text field and the value being entered, so I made it disappear by wrapping it with Visibility widget and setting visible as false.
Visibility(
     visible: false,
     maintainState: true,
     maintainAnimation: true,
     maintainSize: true,
     maintainInteractivity: true,
     child: TextField(...),
)
Now what I have is an Invisible text field to collect the verification code and I take that code and pass it individually to the boxes.
I feel like a problem solver with complicated solutions 😂😅.
Conclusion
I honestly thought I would end up with a much easier solution to what I have. So if you have an easier solution to this (without packages or a custom keyboard) I'm very interested to se how you did it 🙏.
The full code is available on GitHub here

